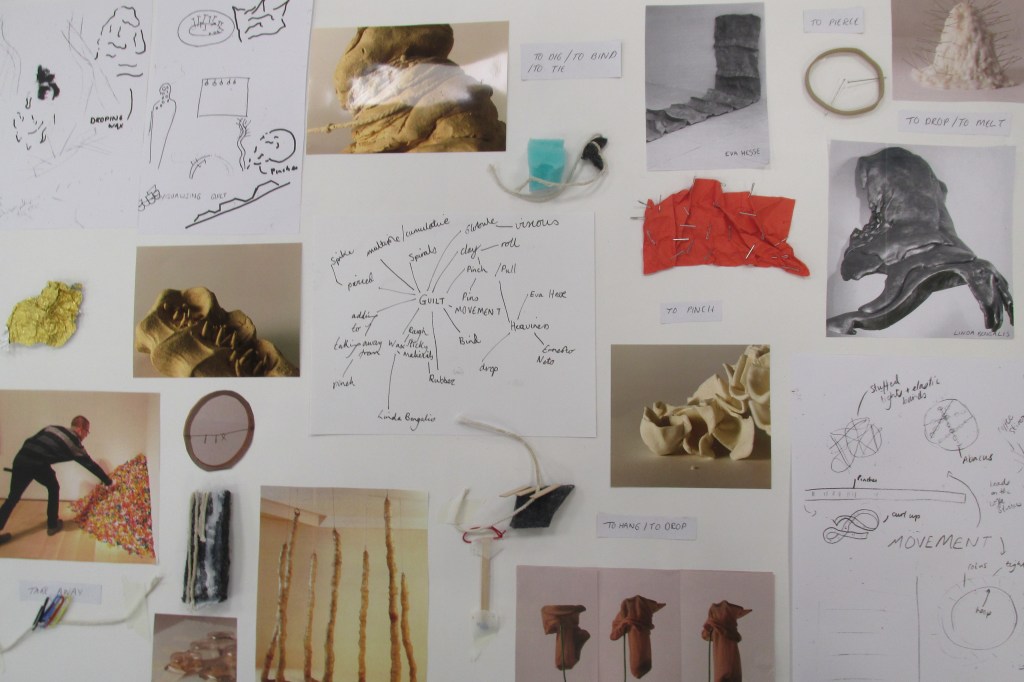
I was about to start writing up some new research, but I realised I’ve been putting off writing up my first experimental piece of finished work in FMP.
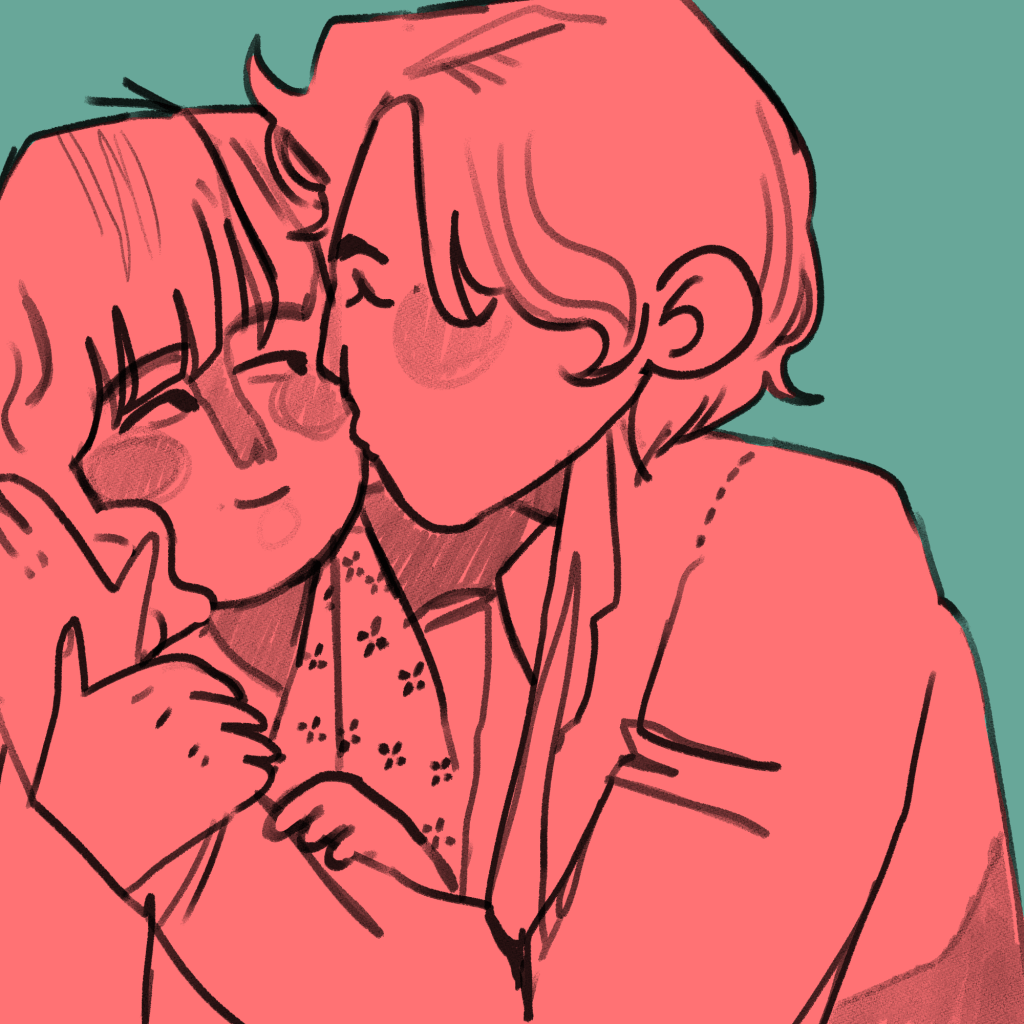
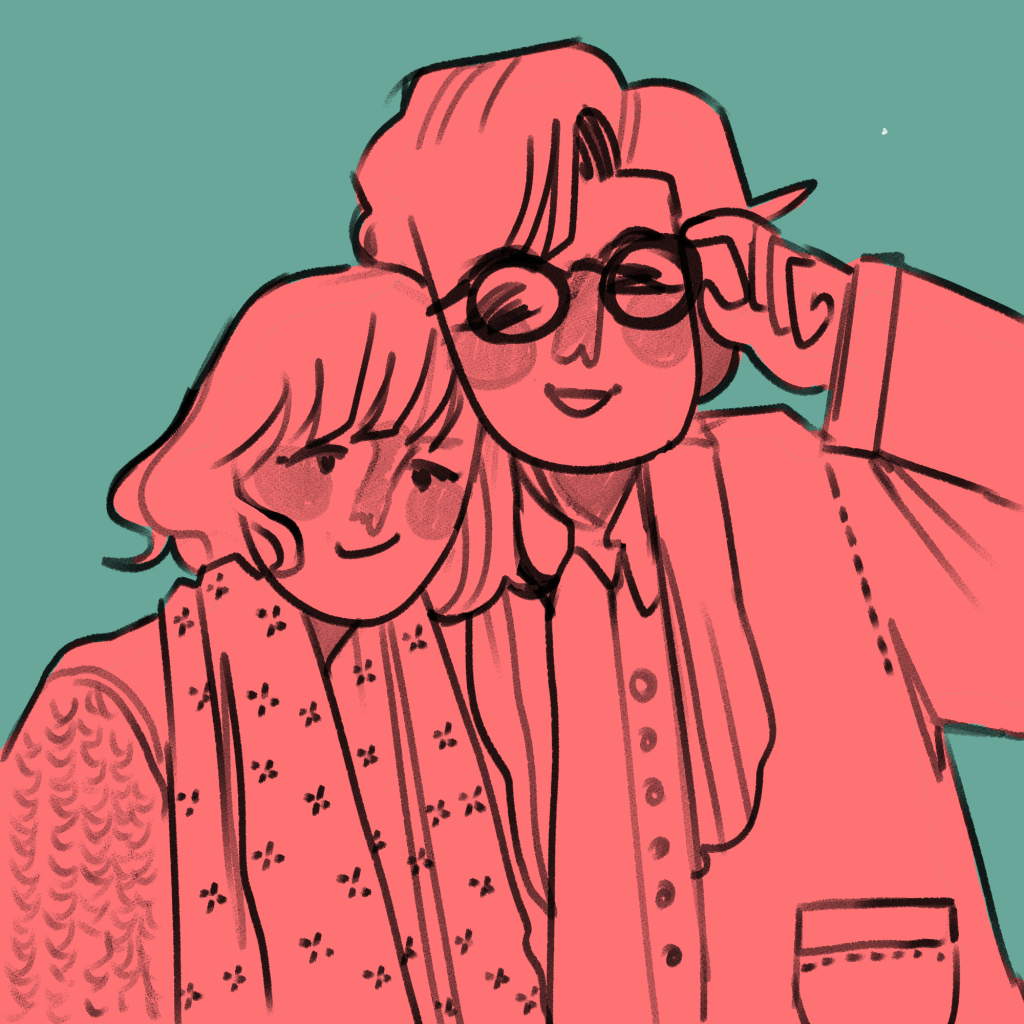
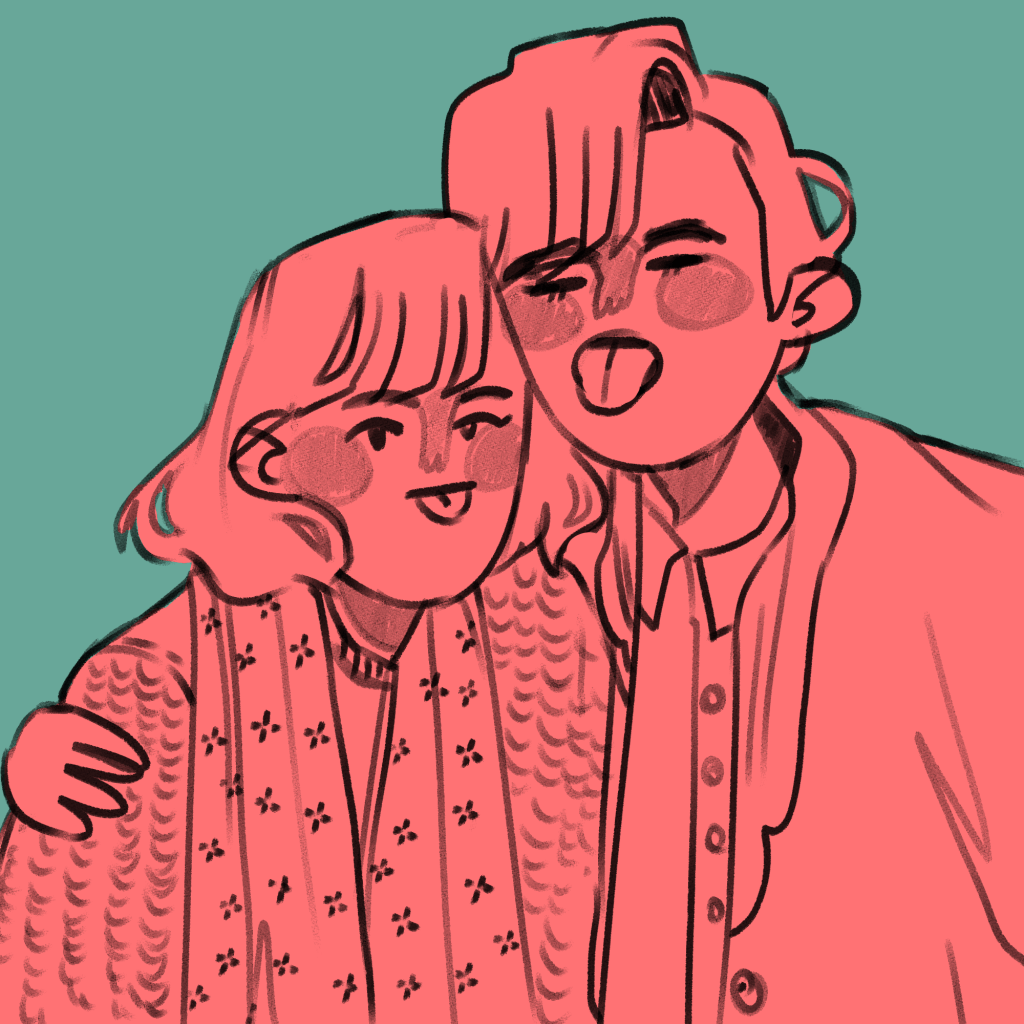
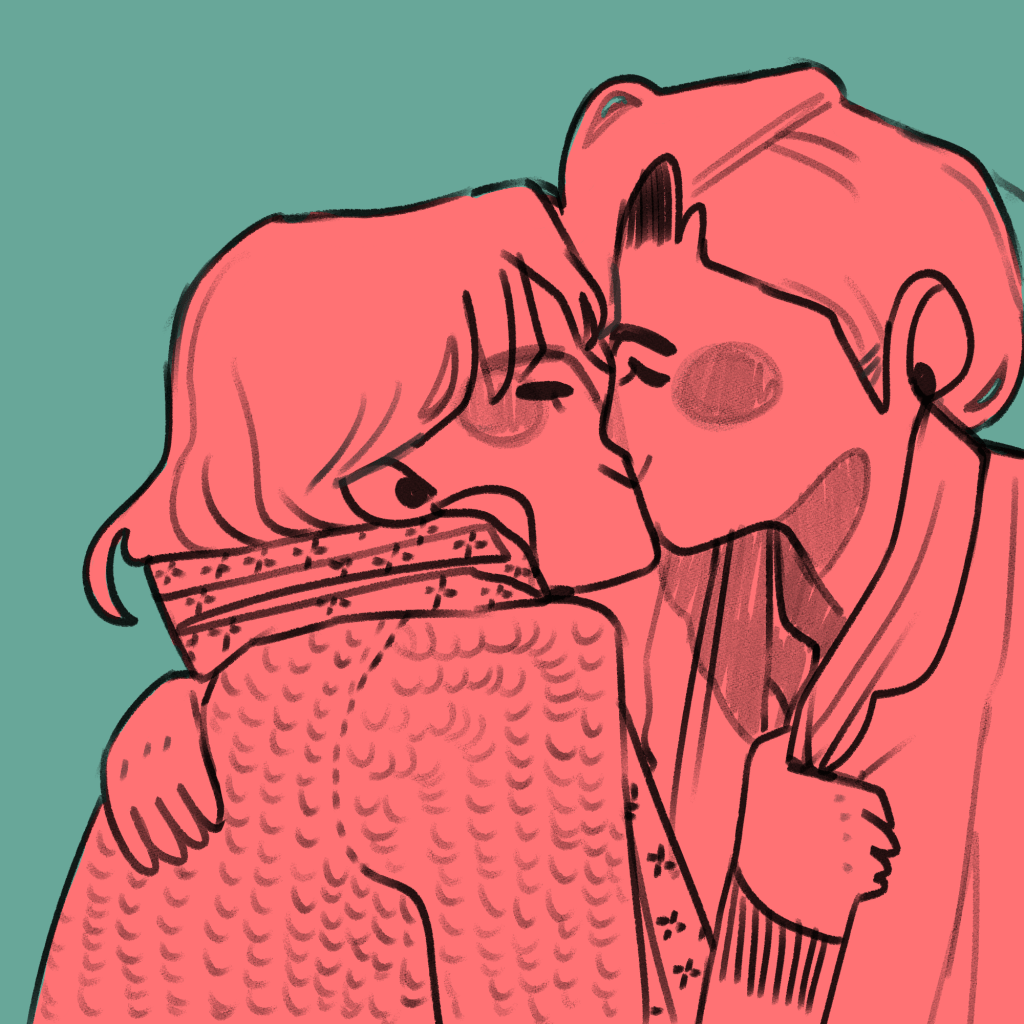
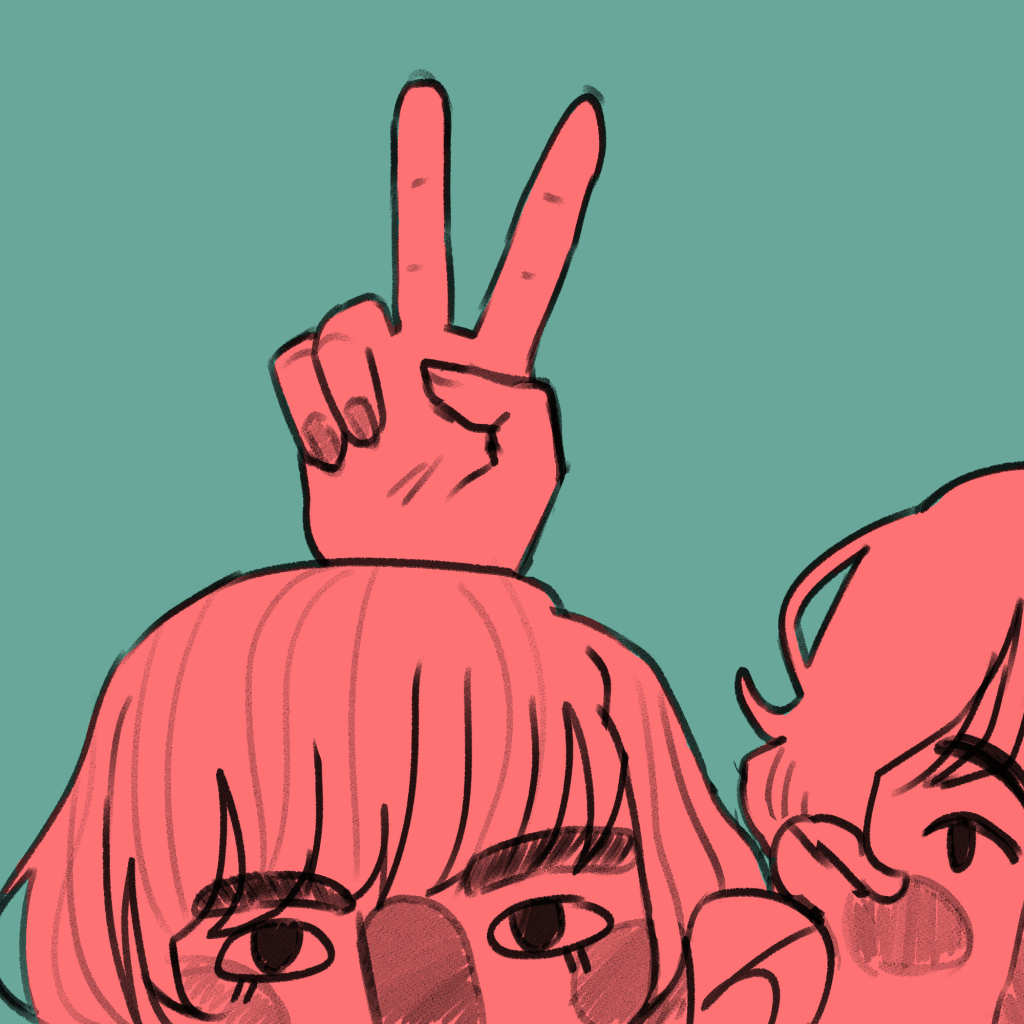
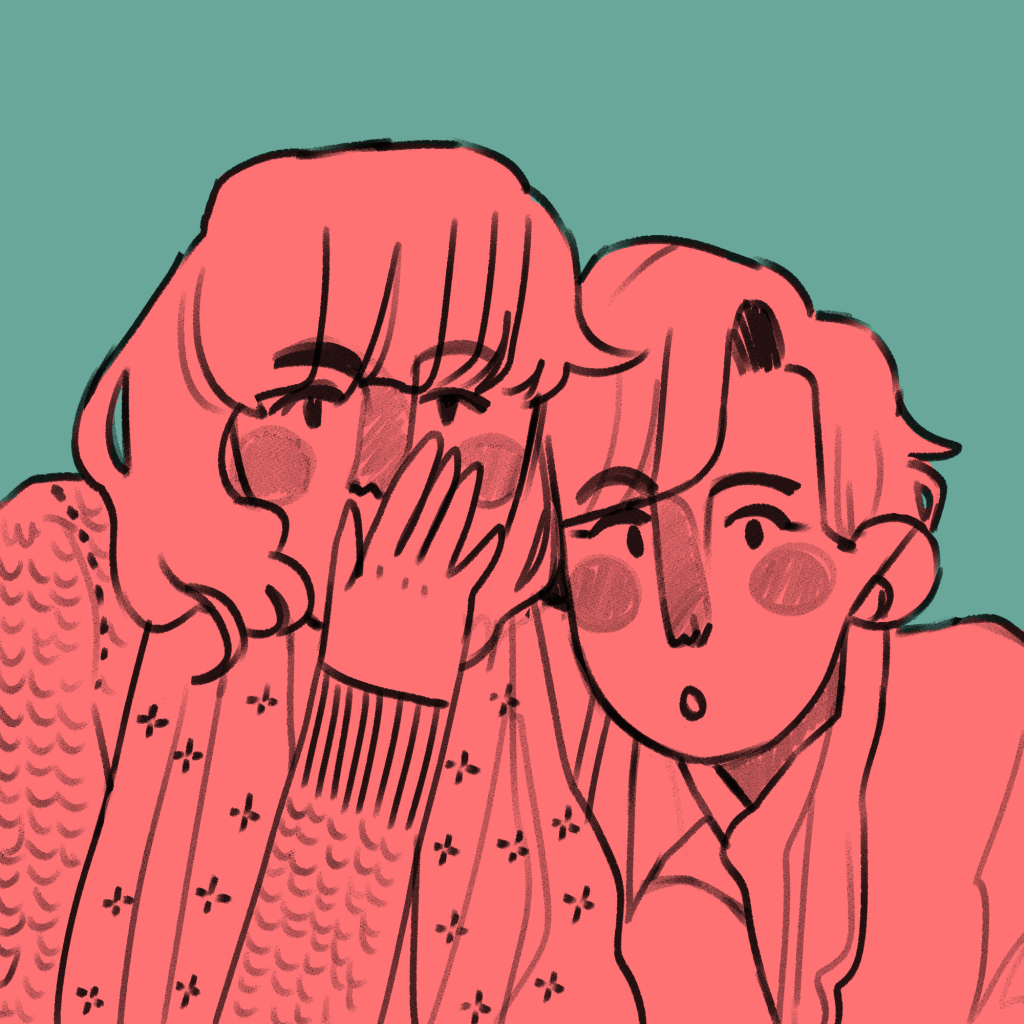
I am using illustration to explore the concepts of friendships, relationships and closeness. In doing this, I illustrated an everyday encounter between Antonia and Mitzi – mucking around in a photobooth. I had the intention to bind it into a mini-zine, an instant book I’d found out how to make in my research.
The illustrations I created came from a variety of different pieces of research. These were all mentioned in my Pecha Kucha, but overall I think they were a huge success.
This is the final result. You can see I experimented with different inks and paper types, including black and white versions. (This is because traditionally, instant zines were printed cheaply in B&W on office photocopiers to be shared and I like the historical aspect of that!).
Evaluation
Was my research purposeful? I would say so! All of the research I do affects my work somehow, because it sticks in my brain like velcro. In this case, though, studying artists like early manga artists and artists that inspire me allowed me to work comfortably in a style I like but to work in a more self aware way, and I think it’s improved the look overall as a result of the research.
Did I develop my ideas thoroughly? The short answer to this is no. Because it was just a response to research and was very experimental, I consider this successful nevertheless. Interestingly, I could focus on the form of the book I bind reflecting the content within the book in future projects. E.g. I could have had these images in a concertina style strip, similar to an actual photostrip that might come from a photobooth.
Where am I going to take this? I’d like to work in the area of “meetings” for a bit – I’ll probably chose one specific meeting and illustrate it in a couple of different ways. I need an experimental week, and to do that I need an image or scene I can experiment with. My thinkinig is circling around Drake meeting Mitzi, Ludwig and Techo. In terms of importance to the entire narrative, I have to say honestly I think this is the most important happenstance in all of the character’s development.
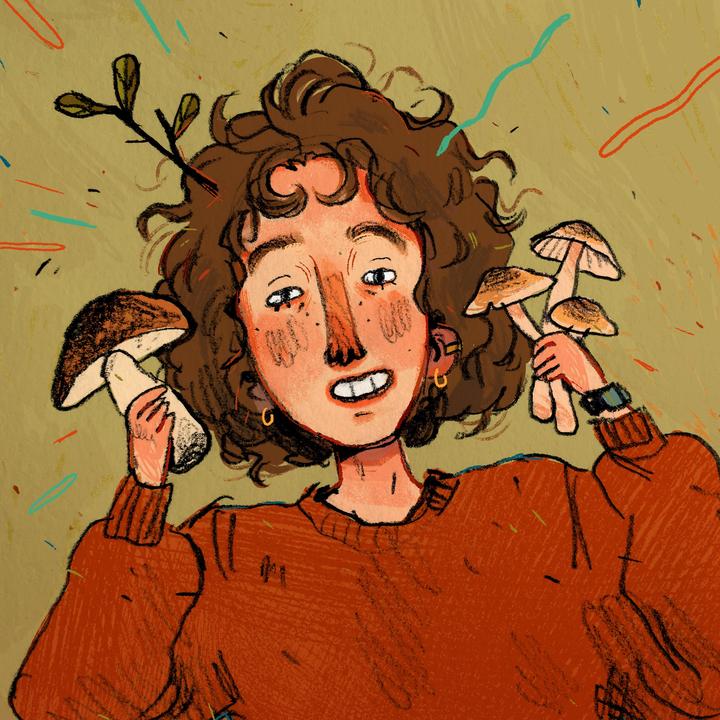
Jamie Green is an illustrator I have been inspired by for months after I found her on Instagram. She is a freelance illustrator and designer, and she works mainly traditionally, e.g. with gouache, coloured pencils, watercolours etc.
Fanart of an indie band. I really like how they draw figures. The jagged, slightly disproportionate limbs are something I want to work into my own style because they make me feel happy looking at them. The colour scheme: pastel pink and blues – exactly my style. And the way she draws faces is pleasing. I like the linework of the noses and the eyes and eyebrows. I want to work like this. The technique used in this sketchbook scan is colouring under full opacity on a multiply later. It allows the lines from a scanned image to stay dark while you colour. I’m realising as I pick out my favourite work from Green’s website that the bright, complimentary colours are some of my favourite aspects of their work. The hand lettering is another similarity between our styles. This is typical of her cosier style. She loves mushrooms and so do I… it’s admittedly part of why I love her work so much. I made breakfast with too many mushrooms for the first time in ages today… I was disappointed at myself. I’ve hit a mushroom limit. Anyway. I really like the “scribbled” texture that comes from working traditionally.
I’ve been influenced, however directly or indirectly, by Japanese comics in a big way in my personal artistic style. I’m researching the context for it, to see the historical and social connections to my current style.
In terms of my personal style, artists I had access to while developing my style were heavily influenced by contemporary manga and anime. This was because of shows like Pokemon, Sailor Moon etc. that many people, including Western / American artists, were exposed to from childhood. The stylised, lineart heavy cartoons I enjoyed on social media growing up were all tied back to Japanese animations and comics.
Hokusai is a famous 19th Century painter from Japan. He’s most known for his woodblock prints and natural paintings, but he created a lot of “playful sketches” (manga) work for his students as well. This is some of the earliest modern manga.
“After Commodore Perry opened up Japan to the West in 1853, an influx of foreigners followed along with the introduction of European and American-style comics. In 1857, Charles Wirgman, a British journalist, published The Japan Punch, a magazine modeled after a popular British humor publication. George Bigot, a French art teacher, started Toba-e magazine in 1887.
While both publications were originally intended for the non-Japanese expatriates living in Japan, the humor and artwork in the pages of The Japan Punch and Toba-e caught the attention of native Japanese readers and artists. Ponchi-e or “Punch-style pictures” began to appear as Japanese artists were inspired by Western-style comics and began the evolution toward the uniquely east-west style that is modern manga.”
At the dawn of the 20th Century, Japanese artists took inspiration from Western comics and applied Japanese ideas to them.
Kitazawa Rakuten (1876 – 1955) is considered the father of modern manga. He was inspired by American artists like Outcault, who created the comic strip The Yellow Kid. He was the first to start a school specialising in caricature and comics.
He drew humorously. The figures are all fun, drawn semi-realistically with a black ink pen.
Machiko Hasegawa was one of the first female manga artists. Following World War II, Japan was occupied by the US. The US had bought in comic and animated characters of their own, e.g. Betty Boop and Mickey Mouse. This was inspiration for a lot of Japanese artists.
I think this is adorable. My characters have an incredible amount of similarity to this work! It’s been so interesting finding out where my style leads back to in its origins.
An example of Hasegawa’s most famous comic strip, Sazae-San.
A really influential early manga artist was Osamu Tezuka. He created Astro Boy, a figure who is now an icon recognisable by almost anyone today.
Tezuka was the first to draw eyes so disproportionately large. Almost every anime and manga in recent decades uses a similar style, so this was revolutionary in terms of the style’s conventions.
I just went onto the Tezuka Osamu website. It turns out that he put the word for insect into his pen name, simply because he loves insects so much… and when you scroll down, you can click a little picture of astro boy shooting up to go back to the top of the page. I actually wept a bit at how sweet it was.
In one of the books I’ve been reading called Greetings From – Retro Design, I carried out some research on Art Noveau as a movement.
It was an artistic response to the rapid technological increases in the 1800’s, for example advancements in electricity and machinery. Artists showed the aesthetically pleasing elements of living in a city around this time. It was a holistic art movement in that the ideology could be applied to almost anything: architecture, furniture, advertisements, etc.
It is defined in the illustrations I’ve researched by a few specific conventions. These are:
Flat, densely detailed illustration
A central female figure – often lewd, or suggestive
Natural and organic detail filling up as much negative space as possible.
Pastel, muted colour pallettes.
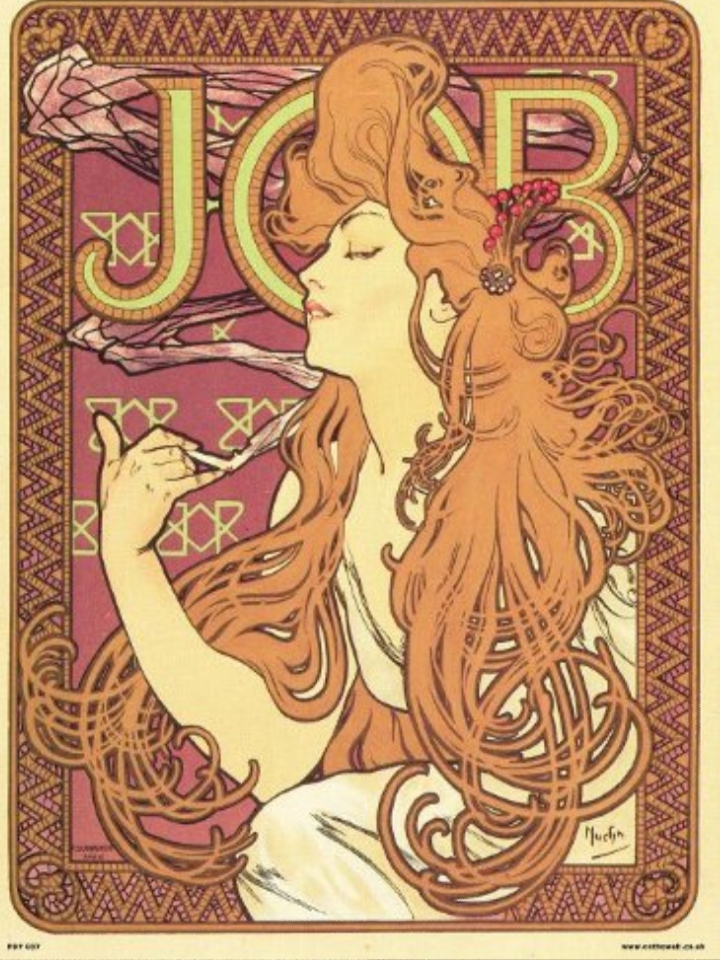
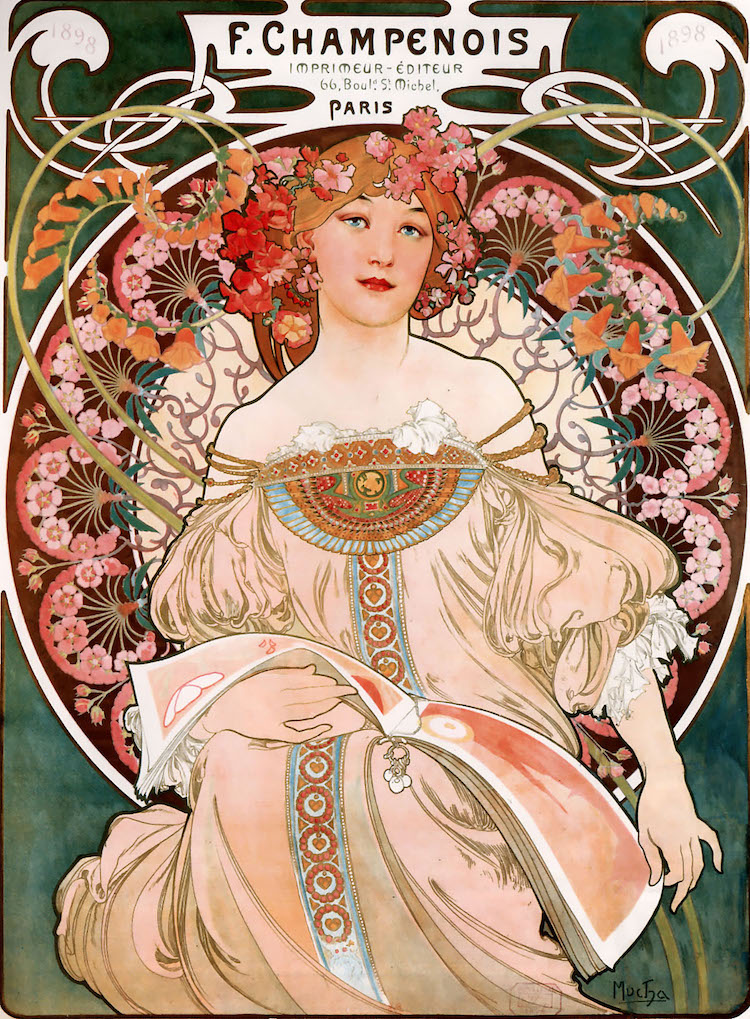
Alphonse Mucha is typical of this art movement. His works are some of the most famous of the time.
I’m inspired by Mucha because of how beautiful his illustrations are. I’m really attracted to the shapes he creates in the images – the circles, the loops and natural curves and how they interact.
I will likely take inspiration from Mucha in terms of my colour schemes. The pale pinks, light browns and beiges are all colours I enjoy wokring with.
I like the way the hair is drawn and how it crosses over itself in a hundred intersections. The fact that it’s in block colour and only the outsides are lined attracts me.
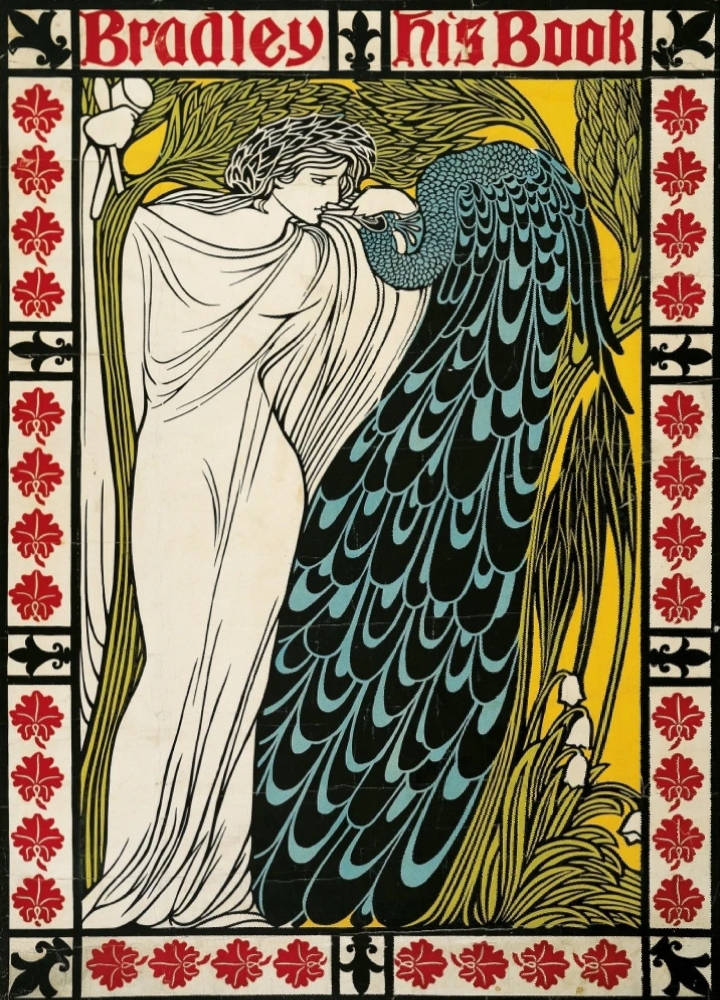
Another artist famous in Art Noveau is Will H. Bradley.
You can see similarities in Bradley’s work, but his work was slightly more progressive in that there’s more negative space than traditional art noveau illustrations. There are larger expanses of flat colour here. Bradley was also famous for designing the covers of Chap Book, a publication that ran through the time of Art Noveau.
I’ve made some work in response to Mucha and Bradley and their working styles.
I couldn’t help but notice that an artist I’ve been inspired by for a long time, KomunHorangi, is clearly influenced by the flowing style of Art Noveau. You can see similarities to Mucha’s work in the way she draws hair.
Although you can clearly tell that she’s been influenced by Japanese manga and animation style (see the huge eyes and facial proportions), you can also see an obvious stylistic similarity in the way the hair is drawn.
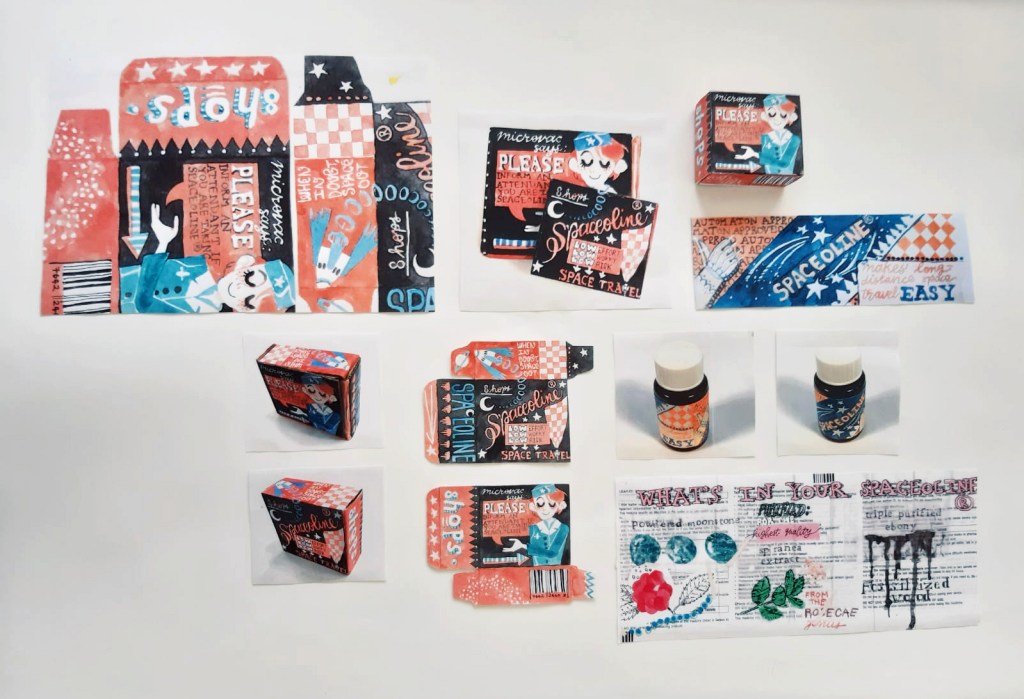
The final sheet! Ft. one fully made, three-dimensional pill box.
I have evaluated the whole of Unit Two against the seven criteria I know I will be assessed on.
Evaluation
Context
I feel as though I’ve tried hard to ensure there was context to Unit Two. Throughout Utensia, I was finding examples of contemporary artists and taking note of where their work sits in the professional field. When I took inspiration from them and made my own work, you could tell that my work would sit in a similar context to, say, Samuel Shumway. His papercraft sculptures work on their own as illustrations and have helped him establish an identity in the industry.
My futures project also referenced context with illustrators like Jonny Hannah. His early work in illustration has led to him creating a book which he’s become well known for. My Spaceoline brand packaging is very similar in tone to his illustrations, and would establish my “look” to potential clients or commissioners.
Research
My research has come in two forms: researching artists’ visual styles and taking reference for my own work, and research into the actual content of the project to get ideas for my illustrations.
An example of the former is my research into Bruno Mangyoku and Toma Vagner’s illustrations. Of my two Spaceoline final designs, the wraparound pot’s colour scheme was directly taken from one of Mangyoku’s illustrations, and the pill box from one of Vagner’s.
An example of the latter is my research from Futures into body modification, e.g. the A.Human fashion show and research into bioluminescent animals for potential aesthetic future surgeries. There is also research into Asimov’s science fiction worlds via reading some of his fiction and then research into the ingredients of pills (paracetamol, opioids, etc) in designing an illustrative “ingredients” sheet.
Development of Creative Practice
There is evidence of experimentation with media throughout my sketchbooks, and notably in my Utensia media worksheet and my Futures initial ideas sheet. There is examples of collage, acrylic, watercolour, collage, buttons, wires etc. and 3D work.
In using my command of watercolour and control over the media, I feel I have created a polished final work in making the two Spaceoline packaging designs.
Problem Solving
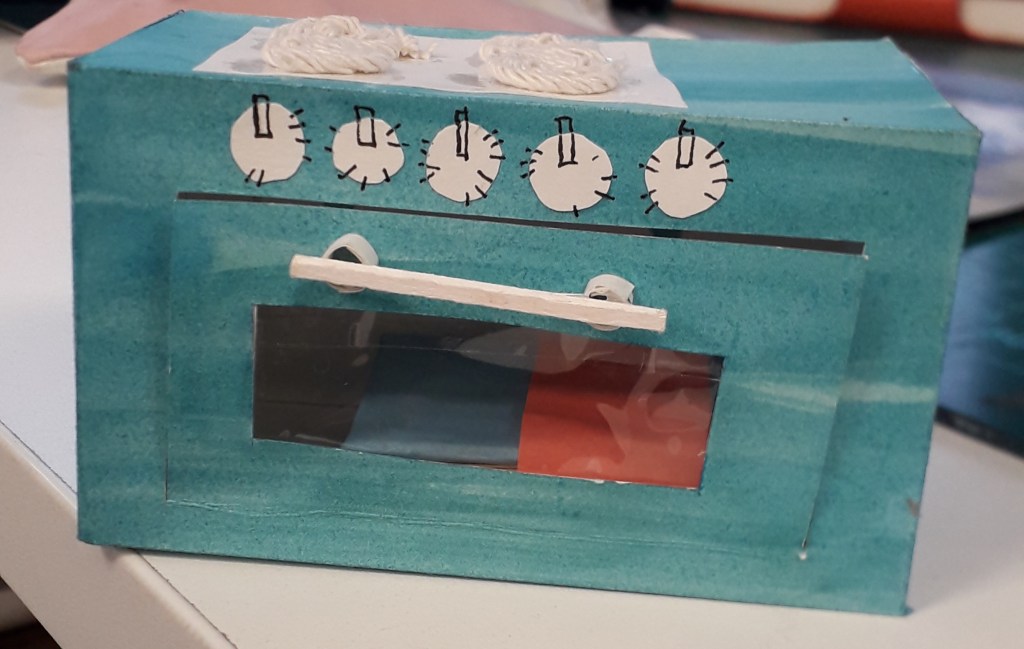
One example of a problem I have had to solve was in creating the Utensia oven. The paper I had chosen to use was too flimsy to maintain structural integrity, especially because I had made it wet once with watercolour and warped it slightly.
I solved this problem by reinforcing each panel with dry, sturdier paperstock. This allowed the thin, elegant visual design I’d hoped for (rather than having used bulky cardboard) while still creating a sturdy final outcome.
Another example of a problem was in colouring the black space between designs on the Spaceoline pill box. The watercolour bled into the coloured designs and was ugly, which I hadn’t seen in retrospect because my practice had all been with lighter colours and painting the outlines before coloured work.
I solved this problem on the go by outlining the words in black fineliner, which bled far less seriously, before going on to paint the rest of the design. This created a barrier between the colours that reduced the bleeding considerably.
Planning, Progress and Production
I have had the chance to create aims and act against them continuously through the project: both Utensia and Futures. This can be seen in weekly numbered blog posts. At the end of each week, I take a step back and create aims for the following week. I also reflect critically on whether I have achieved what I hoped to in the past week. This process has allowed me to stay on top of my work and have something concrete to work towards rather than becoming confused or off-track.
Evaluation and Reflection
In consistent blog posts, I have reflected critically on my own work both positively and negatively. I use a list of questions given to me in Unit 1 to ensure I evaluate effectively. I’m also evaluating right now!
Communicating and Presenting a Creative Practice
I started my work in a sketchbook because the idea of working on A1 sheets made me feel a little ill at the beginning of Futures. However, having the choice suddenly made me realise the value of working on A1 sheets. I just had to come to that conclusion myself!
Since that point, I have presented my work for Futures across multiple platforms. Written research and scratchy ideas are in my sketchbook because I have that to hand most often. Visual development was more successful on A1 worksheets, so I have three sheets of picture reference, drawn images and experimentation that an audience can see a clear line of thought between. My blog has been useful for critical reflection and more in-depth research, e.g. documenting relevant illustrators and documenting the basis of my sci-fi ideas.
Retrospectively, what would I have done differently to improve?
In an ideal world, I would have created another A1 sheet for Futures with more research and initial ideas. There’s easily enough work to fill a sheet in my sketchbook, but my tendency to work small and feel daunted by such a big sheet held me back this time from creating a more completed and professional piece of work.
Now I’ve had the chance to try out so much experimentation in units 1 and 2, I’m getting a better feeling for what I actually enjoy creating. In the Final Major, I feel excited about it because wherever it takes me I can still put my own happy spin on it and enjoy creating the work.
We spent about an hour completing peer review before returning to our own work and self-assessing. I found three students whose work I was particularly drawn to.
Alice
Her work was full of strengths, and it was lovely flipping through her sketchbook to feel all the textures and experiments. She’s successfully developed her own creative practice and used lots and lots of different media in her work.
The only thing she was weaker on was contextualising her textiles work in the professional environment it would exist in. While there was historical research, there was a lack of named working artists or work relating it to the current fashion and textiles industry.
An example of media experimentation.An example of historical research in fashion.
Letty
Letty’s main piece of work was her little A6 sketchbook, absolutely packed with things: textures, experiments, printed photos and a ton of annotations. Her strengths lay in experimentation, evaluation and research into contemporary artists – thus contextualising her work as well. You can see how she’s followed through on ideas page by page.
Her main weakness was that outside of the sketchbook, there weren’t many finished presentation sheets at all – I think I counted four, each with a few photographs on them. This might just be how she works, but it leaves her body of work very informal and possibly a bit incoherent.
Carys (I do hope I’ve remembered her name right!)
Carys’ body of work was one of the largest and most broad in terms of content I saw the whole day. It wasn’t really relevant to my work, but I really enjoyed looking through it. Personal research was a huge strength, with her documenting certain information about herself to manipulate into graphs etc. over multiple days. Her photographs were very high quality and clearly printed somewhere professionally. I also like the textures she creates through experimentation, e.g. creating a stencil for lettering on top of a painted background.
I can’t say I saw written personal reflection, but there’s a good chance it’s either on her blog (which I had no access to) or I simply missed it.
Here’s all of the graphs she created using data she collected about herself.
Finally, as I left I had to photograph Marco’s work because I kept seeing illustration ideas in his hardened orange peel sculptures.
Here, I see two dragons or snakes’ necks and heads rearing back.Here, including the red pipecleaners, I see a pair of really mental, curly thigh-high boots.
Self-assessment
When I returned to my desk I saw some comments people had written about my work, and have since added my own.
Strengths:
Bright colour and confidence
Experimentation of media
Good development from 2D to 3D work
Contextualised in the world of illustration
“Good, stylised use of penmanship”
Weaknesses:
Could include more little models (considering I only just moved to 3D experiments)
BETTER QUALITY PHOTOS. These will finally be possible since over Christmas, I have bought a small Canon camera that is vastly better than my mobile camera.
Generate more textures in my work – I like having fun, bright backgrounds and I want to see if I can push materials to make new combinations and patterns.
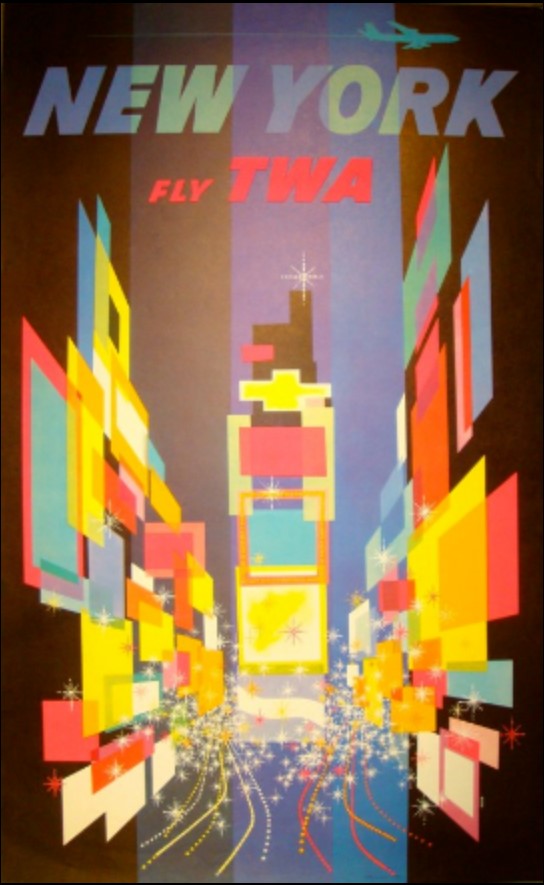
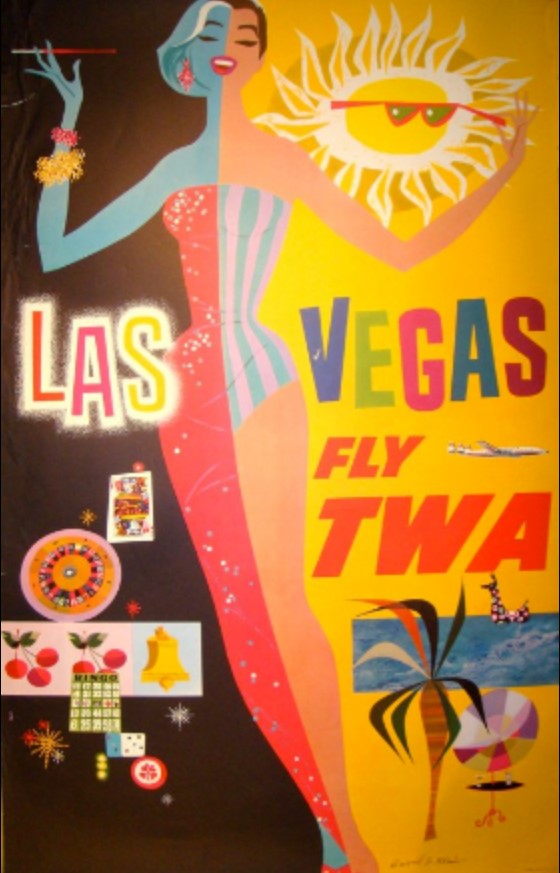
David Klein is an artist that worked from the 1930s through his life to the end of the 20th Century. He was an illustrator that worked widely and across multiple media, but his hallmark work was for TWA travel agency in the 50’s and 60’s.
His abstract, brightly coloured representations of places and landmarks set the tone for a lot of poster art at the time. I’ve included a couple of my favourite images here.
Here’s a sneak peek at my thought process: after a long Christmas of thought, I’ve slowly gravitated towards the idea of futuristic advertisements – and more specifically, products from the future and adverts for them. These products, I want them to be mental and fun. I’ve been brainstorming with some boys in my life who play a lot of video games set in alternate futures, or like sci-fi.
This came from reading a book I got for Christmas about Pop Art and the history of Pop Art. I really like the kind of enthusiastic, hyperbolic and miracle-selling tone that 50’s and 60’s advertisements get across. I want to apply those conventions and feelings in my futuristic art.
Thus, I’ve started taking a lazy look at some of the famous advertisement artists of that time, to get inspiration for colours, compositions and feelings. David Klein’s work appeals to me a lot! The pieces make me feel good.
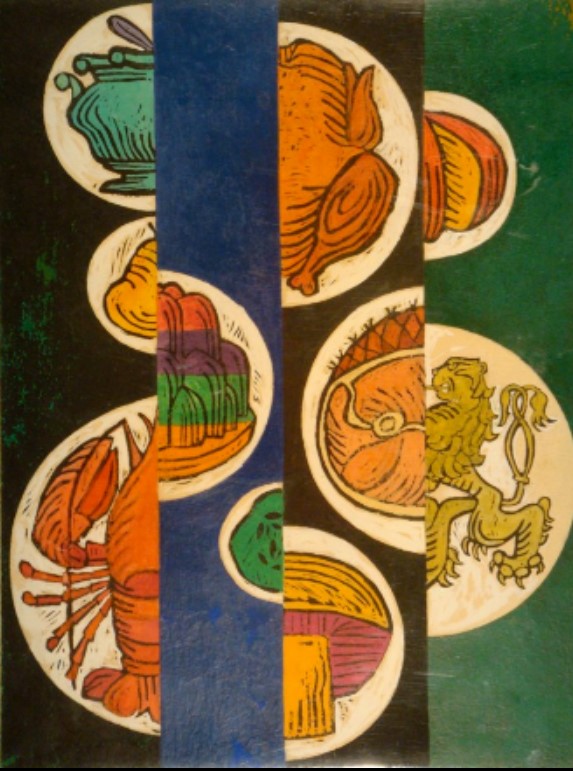
The reds, oranges and yellows in this piece are really vibrant. I like the repeated image of the birds and the triangles that create the sun. The way the bells are drawn is also quite freehand, like my own style. I might use the simple triangle and diamond shapes in my own work.The brightness of the colours here is lovely. Using squares and rectangles to create perspective and a sense of depth is very clever, and something I might use in a background of a piece.I can’t resist art of pretty ladies. Her long legs make me happy! I want to be including pretty women in my product ads, to emanate that “50’s housewife glam” feeling of vintage ads. This is one of Klein’s other illustrations. I like the bright colours and textures; almost feels like crayon or wax resist. Bright colours and bright, simple shapes. I’ve been thinking about some kind of instant food – a powder, probably, that has “just add water” to make it a full and complete meal! So maybe I’ll use this composition as inspiration for that. These look like lino cuts. I never considered lino cutting for this project…. interesting….
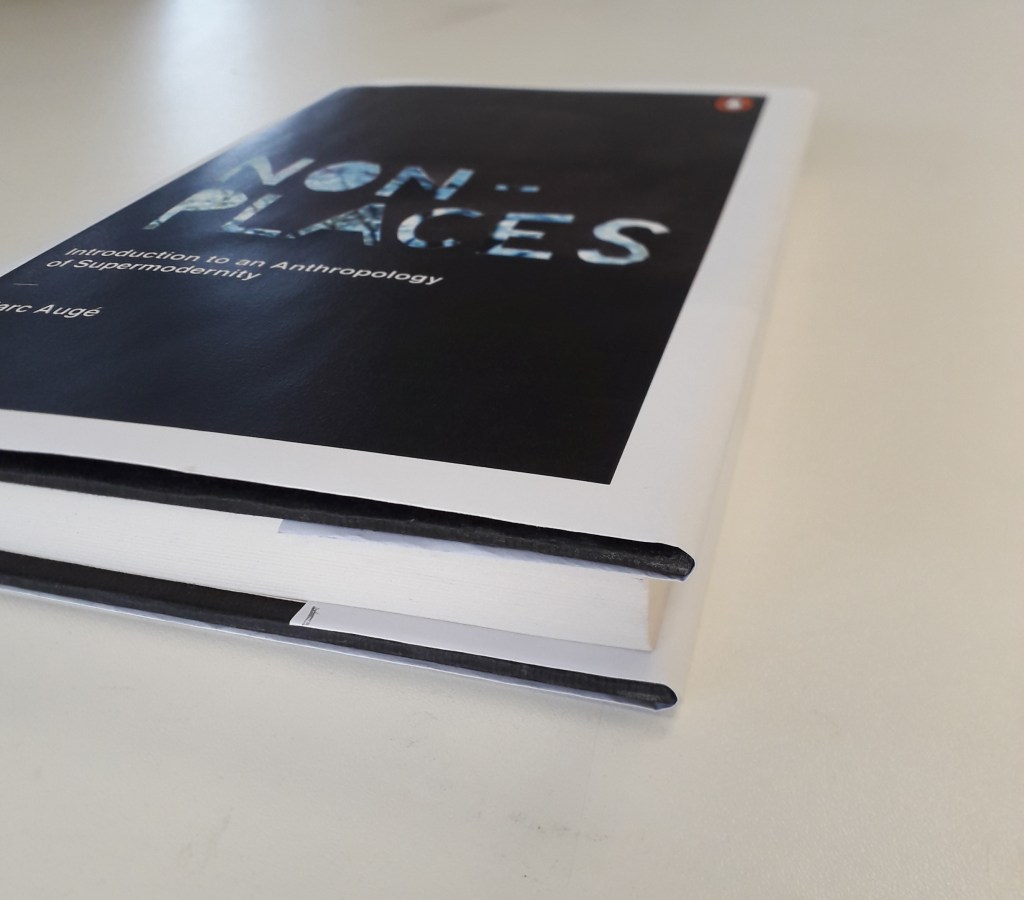
This was the last week of the graphic design project, and I got to finish it!
I printed off the book jacket at the correct scale. (Side note: with every single Mac refusing to print my InDesign document in any format, it took me over an hour to get this single thing done. Macs exhaust me and I don’t care for them.)
I measured and wrapped it round the book, to provide photographic evidence of it in an applied situation for my final worksheet.
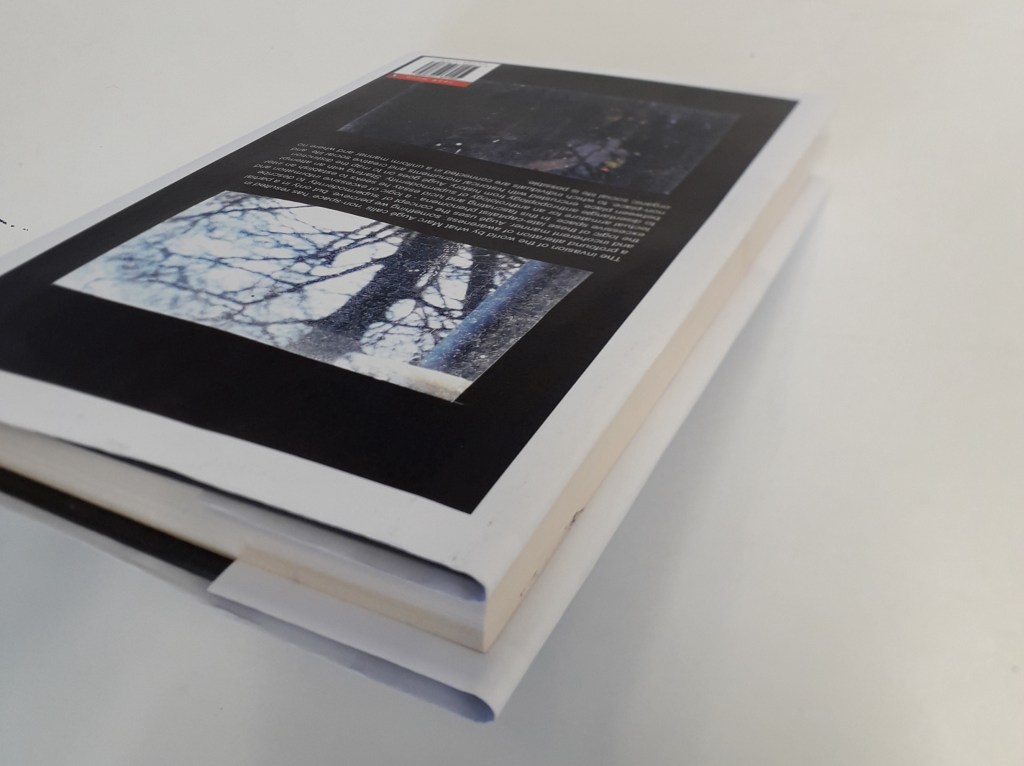
What do I think went well with this project?
I am happy with the overall look of the book. The image for the front cover, touched up in PhotoShop, was very successful. I’m glad I went for the cooler colour scheme in the end because I feel it communicates the concept of “non-places” better: cold, connoting isolation, loneliness and a lack of emotion. I suppose the fact that the trees are bare against a cold sky is appropriate as it shows a place where life can’t be sustained, just as Auge states that life can’t be sustained in non-places.
What do I think didn’t go well?
I feel like despite all of the time that went into it, this final cover looks a little primitive. This might be because of the white edges: although I made that decision carefully in relation to Penguin’s brand identity, the block photographs on white coming out of a normal printer made it look a little thrown-together. To solve this problem, the cover being printed on glossy paper may have given it the professional look it needs.
In addition, I feel like the positioning of the blurb in relation to the image looks a little unfinished. It’s legible and the front and back cover images tie in together, but just as a block of text it sits strangely against the black paper cutout. If I’d had more time, I could have experimented both with the text and the back cover image entirely.
How did I develop my ideas and how could I have developed them differently?
After a session so heavily focused on hand-lettering, I felt almost pushed to create something that was centred on the lettering. That’s the main reason why my research and experimentation drew me towards the stencil-cut type.
I would have liked to have experimented a little further with my collage ideas, maybe: the images I had collated were all quite interesting and it seems a shame my process meant they didn’t make it into the final piece.
Were the media and techniques I explored successful?
I think a downfall with my collage pieces was that I tried to recreate them on PhotoShop from the start. It just doesn’t have the same feeling as the truly torn and cut work I had on one of my worksheets. A limitation of working with collage at any kind of scale is that I literally don’t have the money to be printing sheets and sheets of coloured images to experiment with – as much as I’d like to. This meant that my collage work was quite small, which would have been difficult to scale up at any sort of quality.
A way to solve this problem might have been working digitally from the start (so as not to lose anything in translation between traditional and digital). Alternatively, I could have created a series of pencil thumbnails with possible collage ideas and compositions on them, so when I did come to printing and collaging I had something in mind. This does take away from the freeform experimental approach, though.
Hey, maybe I could have printed off all of the work and cut it up but just photographed compositions I liked rather than sticking them down. That would mean I could still play around a lot, but would mean I could reuse images I liked rather than having to print a ton of duplicates.
Inspired by a number of artists, my research and work is bringing the illustration project near to a close.
Before the day, my research into papercraft and pop-up work led me to work for a few hours and create a few 3D experimental media iterations.
Above are three iterations of possible interactive oven doors based on various drawings from my initial ideas or media experimentation sheets. Note the zigzag texture was inspired from Samuel Shumway, my researched papercraft illustrator!After a conversation with Louise, I was determined to create a little notebook that would fit inside the final coloured 3D oven. I have decided it’s a complete little experience for the viewer: getting to take something out of the oven after opening its door, and then getting to open that again and look inside! The notebook is concertina folded with paper-covered mounting board I took from small offcut board scraps. The inside is mixed media_ brown paper, magazine, masking tape and coloured paper all glued together in ragged strips to create interest. After taking this image, I actually ran it through a sewing machine a few times to add stitch as further interest.An image of the final 3D oven with its precious little clear window, perfectly sized to house my book.beep beep beep! Notebook’s ready! Maybe you need tiny finger-sized oven mitts to take it out safely.
What was successful and why? In this section, I was proud of how the oven doors came out. I especially liked the zigzag texture, clear oven window and little wooden handle. In terms of the book, I’m proud of how textured the inner pages are, and also quite pleased with how straight I ended up getting the pages and mounting boards despite assembling it from so many separate pieces.
What was less successful and why? The final oven’s construction was needlessly laborious. This was a material limitation: all I had to hand was paper or cardboard, no cardstock which would have been an appropriate midpoint. I was also fuelled up on so much inspiration and so little money that I could neither have waited for nor bought the materials I wanted. I worked around it by reinforcing four of the six net panels with another layer of thick paper, meaning it’s quite structurally sound now.
Where will I take this? After Stephen Fowler’s work inspired me in terms of small-scale bookbinding and stamping, all I have left to do is find myself a rubber or two to carve some stamps into! I’d like to populate my little notebook with relevant stamps of ovens or grills. After that, Christmas is so close I doubt I’ll be continuing further.
I hope once completely finished with the project to create one more blog post of critical reflection on the project as a whole.
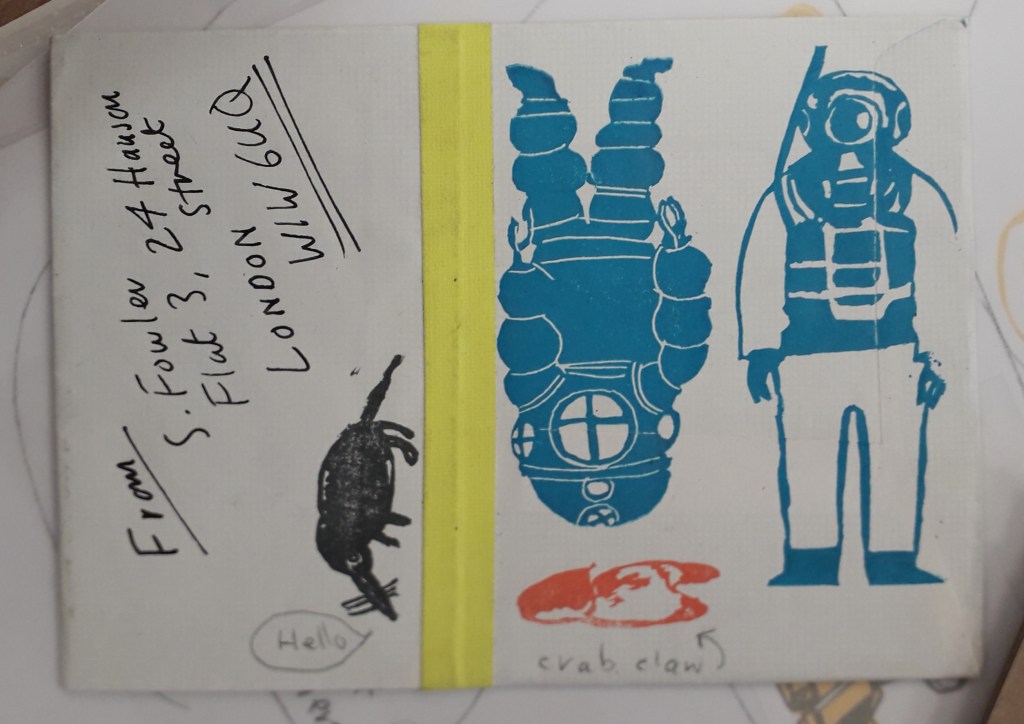
Stephen Fowler came to the university to give a talk on illustration this Wednesday. He was a really unique, interesting person!
The work of his that interested me the most was his experience in rubber stamps. He has a book published on rubber stamping, and the talk he gave really inspired me. I like the idea of basically a small-scale, informal lino cut printing. It sounds like it was personally made for me.
This was some of my favourite work. I don’t actually think it’s Fowler’s but it’s still a good example. The block colour underneath some form of detail really interests me, like a two-step process. I also love that it’s bound into a book.
The concept of using rubber stamps in small hand-bound books really appeals to me. Critically, the research has already come in useful because I’m making something similar to this for my Utensia illustration project.
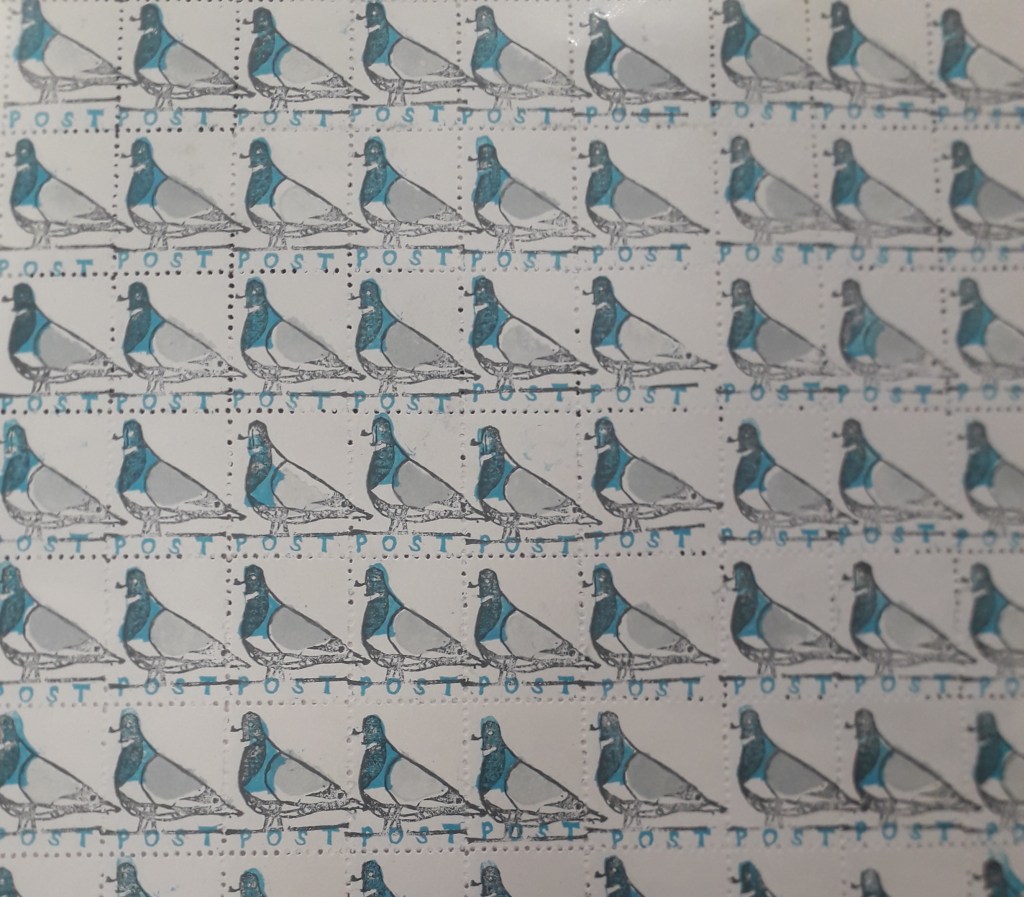
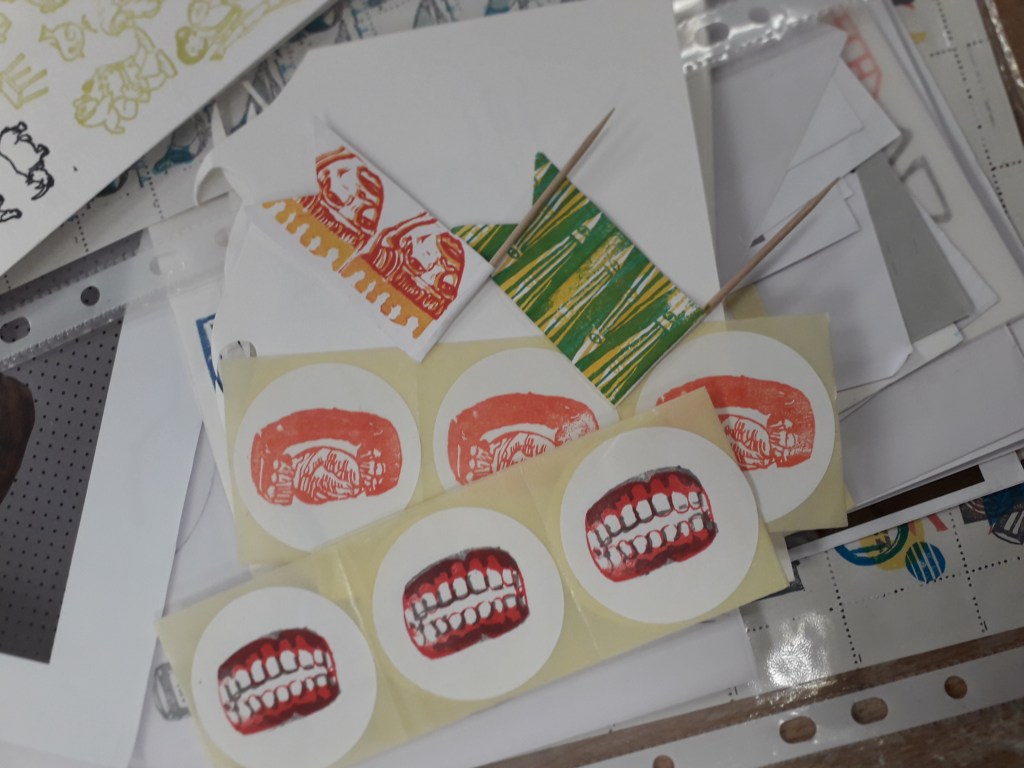
Printing on all sorts of things to personalise them makes me smile inside and out.The colours used for these pigeons and the small scale it’s on made me fall in love with this sheet of stamps instantly. If I stamped something similar and used an unthreaded sewing machine to perforate the stamps, perhaps…Some more examples, including on stickers which again really appeals to me.
Interactive illustration in general seems to be where I gravitate, be it on stickers, stamps or in books. Even my recent papercraft in the Utensia project has been inspired by the idea of my little ovens having interactive doors.
Where can I take this research? I’ve already started making work inspired by Fowler’s talk, but I can see it taking centre stage in a self-directed project. Any subject might suit stickers or stamps… after quite a few years of being pushed hard to work bigh because “scale shows confidence”, Louise supporting small scale illustration feels awesome!


You must be logged in to post a comment.